
Are you interested in a healthy upgrade to your pies? This Spelt Flour Pie Crust recipe is the perfect way to do that. Spelt flour pie dough is surprisingly very easy to work with and this reliable recipe will produce a flaky crispy pie crust that will turn a beautiful golden brown colour as it bakes. This pie crust recipe is suitable for savory or sweet pies. If you’re not familiar with working with pastry there are a few simple guidelines to follow that will lead to success which I will share in this post. Don’t fear! You can do this.

Why is spelt flour a healthier choice? Many people find spelt flour to be more digestible than modern wheat flours. That may be because spelt flour is an ancient grain that hasn’t undergone the hybridization that modern wheat has. Spelt flour does contain gluten but less of it. Some individuals with gluten sensitivities find that spelt flour can be incorporated into their diet without a problem. So cheers to enjoying more pie!
We love pie in our house, so much so that we have a savoury meat pie every year as part of our family Christmas celebrations. My favourite thing about pie is the contrasting texture of the crispy crust with the filling.
I have three quiche recipes that go perfectly inside this pie crust recipe: Broccoli Goat Cheese Quiche, Cottage Cheese Quiche and Sun-dried Tomato Pesto Quiche.
Jump to:
Why You'll Love This Recipe
- Easy to Work With: The dough is forgiving and simple to roll out, even for beginners.
- Customizable: Use it for a variety of pies, from savory chicken pot pie to sweet fruit pies.
- Made with Light Spelt Flour: Adds a subtle nuttiness and nutrition.
- Made Ahead: The dough can be made ahead and chilled until you’re ready to use it.
Ingredients

- An important note: This recipe requires light or all-purpose spelt flour not whole grain spelt flour so be sure to pick the right type when shopping. Also, keep an eye out for sprouted spelt flour. If you can find a sprouted spelt flour, it has even more nutrients and digestive benefits.
See the recipe card below for a full list of ingredients and measurements.
How To Make Spelt Flour Pie Dough
Here are the step-by-step instructions to make this recipe.
Step 1: Mix the dry ingredients and add cold butter and lard.
Note: this recipe makes enough pie dough for one 10 inch pie plate. If you’re making chicken pot pie where you need a double crust for top and bottom, then double this recipe.
In a large mixing bowl combine flour, salt and sugar and stir well to combine. Add very cold cubed butter and lard to the mixing bowl.

Step 2: Cut in the butter and lard.
Cut the butter and lard into the flour using a pastry cutter or fork until the pieces are the sizes of large peas (some slightly larger pieces are okay).

Step 3: Add water.
Add a few tablespoon of ice water and begin to work the water through the flour with a fork. The dough will start to form large clusters. If you can squeeze the dough together with your hands and it stays, you have enough water. If it falls apart, add a bit more water but no more than a tablespoon at a time.

Step 4: Lightly knead dough into a ball and chill.
Turn the dough out onto the counter and give it a few light kneads to make it hold together in a ball. (Handle the dough as little as possible in this step.)
Pat into a disc shape and cover with plastic wrap. Refrigerate for at least half an hour before rolling out.

Step 5: Roll out the dough.
Take the dough out of the fridge and lightly flour your work surface and the top of the dough. Using a rolling pin, roll out a 12-13 inch circle. (You can check that your circle of pie dough is big enough for your pie plate by holding the pie plate upside down over the dough and ensuring there’s at least 1 inch of dough around the pie plate.)

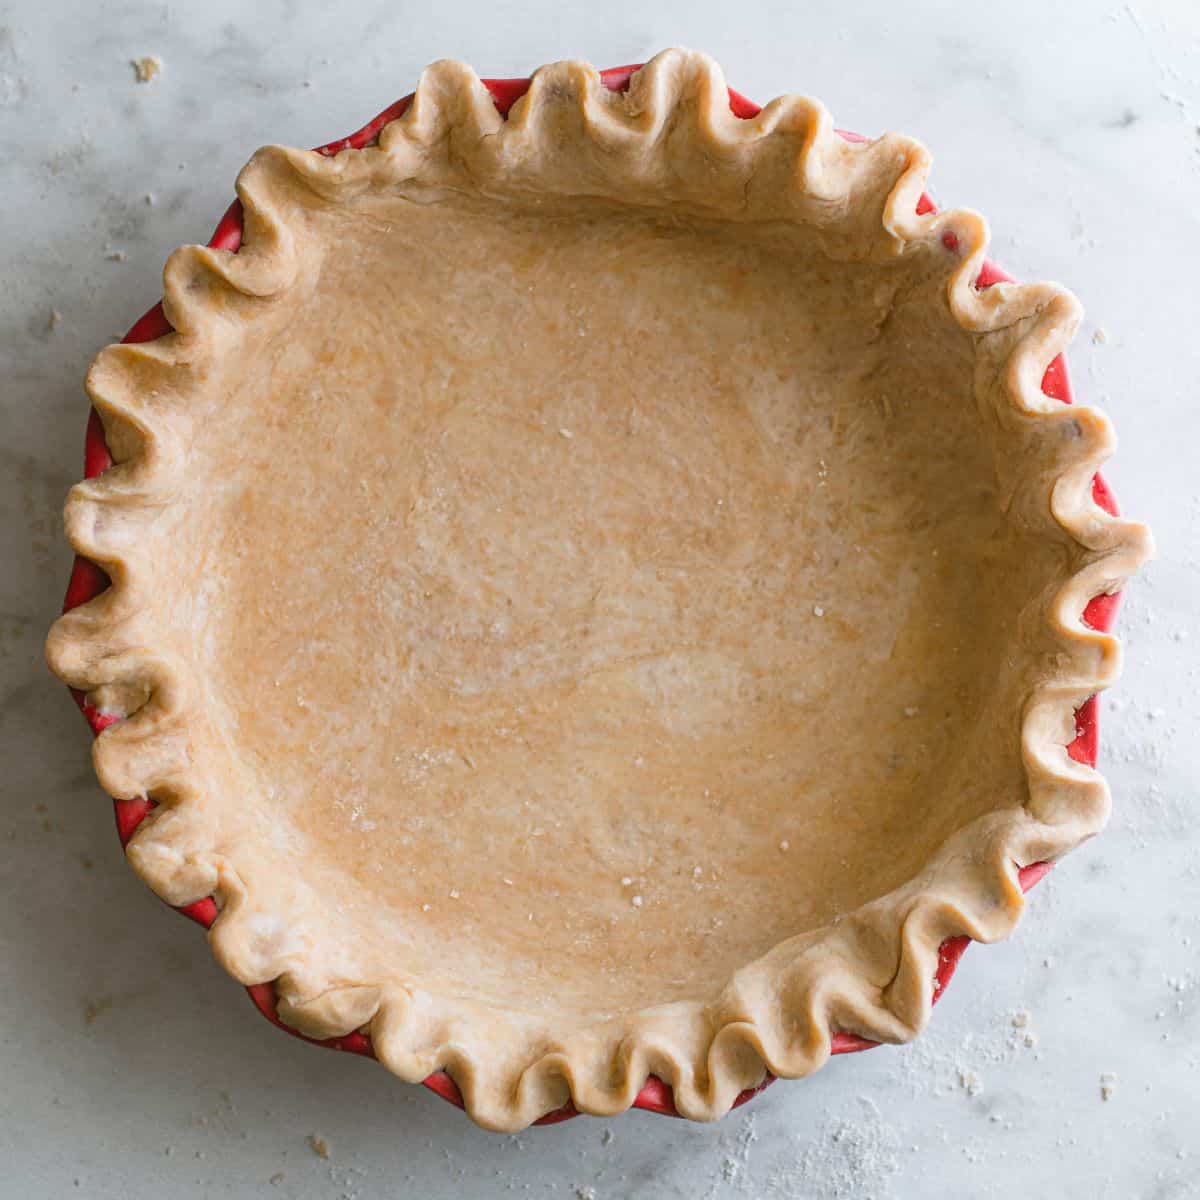
Step 6: Press the dough into the pie dish.
Carefully transfer the dough into the pie dish. Without stretching the dough, carefully press the dough into the bottom and sides of the dish. Trim excess dough with a sharp knife or kitchen scissors.

Step 7: Crimp the edges and chill before baking.
Fold the edge of the pie dough underneath itself. Tuck and press with your thumbs and then crimp the edges.
Note: if you’ve doubled this recipe, wait to crimp the dough until you’ve added the top crust. Also, if you have an upper crust be sure to add vents.
Refrigerate the dough again for 15-30 minutes before adding filling and baking.

Expert Tips
- The most important tip: Keep everything cold. Really cold. Everything. In the book Art of the Pie the author, Kate McDermott gives this advice: “Keep everything chill, especially yourself.” I love that. Some expert pie makers really go the extra mile. They chill not only the water and the butter for the pie dough but also the mixing bowl, the flour itself and the pastry cutter. They even run their hands under ice cold water before handling the dough. Full disclosure, I don’t do this every time but I definitely go to this length if I’m making pie dough on a hot summer day. I’ll do whatever it takes for success. But no matter what the weather, ice cold water and super cold butter and lard is a must.
- As you incorporate the butter and lard you want to leave pockets of fat. Do not fully incorporate the butter into the dough. This is why you want the ingredients to be cold so that the fat will not just meld into the other ingredients. Some recipes will say to incorporate the butter until the remaining pieces are approximately pea sized but I like to go a little bigger than that.
- Add water, just a few tablespoons at a time. Use only as much water as necessary. You want just enough to hydrate the dough. You can test if you have added enough water by giving the dough a little squeeze. If it holds together, you have enough water. If it just crumbles apart again, then add another tablespoon of water. Stir together and test the dough again.
- Be adaptable and trust your baker’s instinct. If you think that the butter is starting to get too soft, pop the dough into the fridge for a few minutes to chill. If you think the dough may be too dry, then add a touch more water. When you feel a little adjustment needs to be made, you're probably right! You can do this.
- Allow the dough to chill in the fridge for a minimum of half an hour before rolling out.
- Keep in mind that spelt flour dough is slightly more fragile than all-purpose flour pie dough because it contains less gluten, so be mindful when lifting the dough into the pie dish.
- If you don’t own a pie plate, a 10 inch cast iron pan will work well!
Recipe FAQs
The dough should hold together when you squeeze it with your hand but not feel wet or sticky. Add water gradually, a tablespoon at a time.
Absolutely! Wrap the dough tightly in plastic wrap and refrigerate for up to 3 days or freeze for up to 3 months. Thaw in the refrigerator before rolling out.
More Spelt Flour Recipes:
- Spelt Flour Chocolate Chunk Cookies
- Spelt Flour Cinnamon Buns
- 24 Delicious Spelt Flour Recipes
- Spelt Flour Pancakes
- Spelt Flour Banana Bread


If you tried this Spelt Flour Pie Crust Recipe or any other recipe on my website, please leave a 🌟 star rating and let me know how it went in the 📝 comments below. I love hearing from you!
Recipe

Spelt Flour Pie Crust
Ingredients
- 1 ½ cups light spelt flour
- ¾ teaspoon sea salt
- ½ tbsp sugar or coconut sugar
- ⅓ cup cold unsalted butter (76 grams)
- ¼ cup cold lard (57 grams)
- ⅓ cup ice cold water add gradually, use more if needed
Instructions
- Note: this recipe makes enough pie dough for one 10 inch pie plate. If you’re making chicken pot pie where you need a double crust for top and bottom, then double this recipe.
Make Pie Dough
- In a large mixing bowl combine flour, salt and sugar and stir well to combine.
- Add very cold cubed butter and lard to the mixing bowl. Cut the butter and lard into the flour using a pastry cutter or fork until the pieces are the sizes of large peas (some slightly larger pieces are okay).
- Add a few tablespoon of ice water and begin to work the water through the flour with a fork. The dough will start to form large clusters. If you can squeeze the dough together with your hands and it stays, you have enough water. If it falls apart, add a bit more water but no more than a tablespoon at a time.
- Turn the dough out onto the counter and give it a few light kneads to make it hold together in a ball. (Handle the dough as little as possible in this step.)
- Pat into a disc shape and cover with plastic wrap. Refrigerate for at least half an hour before rolling out.
Rolling Out the Dough
- Take the dough out of the fridge and lightly flour your work surface and the top of the dough. Using a rolling pin, roll out a 12-13 inch circle. (You can check that your circle of pie dough is big enough for your pie plate by holding the pie plate upside down over the dough and ensuring there’s at least 1 inch of dough around the pie plate.)
- Carefully transfer the dough into the pie dish. Without stretching the dough, carefully press the dough into the bottom and sides of the dish. Trim excess dough with a sharp knife or kitchen scissors.
- Fold the edge of the pie dough underneath itself. Tuck and press with your thumbs and then crimp the edges.
- Note: if you’ve doubled this recipe, wait to crimp the dough until you’ve added the top crust. Also, if you have an upper crust be sure to add vents.
- Refrigerate the dough again for 15-30 minutes before adding filling and baking.
Nutrition
If you make this recipe please leave a comment and give this recipe a rating! I aim to respond to every single comment. I am so grateful when you trust me and try one of my recipe creations in your own kitchen. I love to hear how it went! Let’s connect on Instagram and tag me in your food pics!
‘Til next time,
Christy


Kpat says
I wanted to use up leftovers from a roast chicken dinner from the night before, searched for a recipe to make a spelt crust pie, found this one, definitely easy to make, followed the instructions of keeping the ingredients chilled throughout the process, used all butter as I didn’t have lard, and I made mini pies in a muffin tray, they worked beautifully! Was very impressed and so was my husband, will be making this pie crust recipe again! Thank you.
Meg says
SOOO good and easy! Will be going into my regular recipe rotation. Thank you!
Carol says
I have made this recipe a few time for an amazing apple pie and for Tourtière.
Such wonderful results
Nancy says
My mom has issues when eating lard so I don’t use lard in any recipes. Is adding more butter a better substitute for lard for this pie recipe. What would you suggest?
Christy Faber says
Hi Nancy! I have never tested this recipe with 100% butter but I do think it will work! If you try it please let me know how it is!